We’ve all had to use a scrap of wood or a broomstick and our Brunton to measure the orientation of a seismometer in the field. In a vault or in a post-hole it can be a slow and inaccurate process. Calculation of the instrument orientation is post-processing can be time consuming and error prone as well. The LSO100 solves these problems for a fraction of the cost of a gyrocompass or other orientation technologies!
This website serves as the user manual and documentation for the LSO100. If you wish to purchase an LSO100, please visit our website at www.leemangeophysical.com.
User Manual
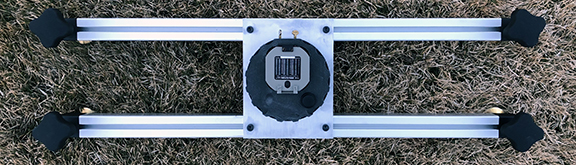
Congratulations on your purchase of the LSO100 - a laser orientation device for measuring the orientation of magnetic instruments in a down-hole situation. This instrument is designed to stand up to field conditions and provide years of simple and reliable service to your research group. The body is made from durable and non-magnetic ultra high molecular weight (UHMW) plastic with corrosion resistant brass set screws. the frame is made from sturdy aluminium extrusions that have been anodized for protection against the elements and easy cleaning. Finally, the custom designed leveling feet provide nearly 2.5 cm of adjust up and down independently on each leg of the instrument.
While operation of the instrument is simple, we encourage you to read this short guide on it’s proper setup, operation, and maintenance to maximize your return on investment.
Unpacking and Setup
Your LSO100 comes pre-assembled and in a cardboard shipping container. If you purchased in optional hard-carrying case, the instrument will be shipped in that enclosure. To begin using your LSO100, simply install the batteries.
Using the LSO100
Using the LSO100 to take an orientation measurement takes approximately one minute. The setups are outlined below and an instructional video provided.
- Ensure site safety. Check the surrounding work area for any hazards and clear them before beginning.
- Remove the instrument from its case and set it centered over the borehole or vault. If your application requires longer spans than the stock legs, install the optional extended leg kit.
- Insert a standard Brunton pocket transit into the compass opening with the lid opening towards the center of the instrument. Ensure that the Brunton has the correct magnetic declination set before inserting into the instrument.
- Using the two thumb screws, lightly secure the Brunton into the LSO100.
- Open the Brunton and use the leveling bubble and four hand leveling screws of the LSO100 to level the device over the sensor downhole.
- Turn on the laser line and rotate the base plate until the line is aligned with the alignment mark on the downhole instrument. Never look directly into the laser!
- Read and record the compass azimuth.
- Turn off the laser and stow the equipment. (Remove the compass if desired.)
Maintaining your LSO100
Routine Maintenance
The LSO100 requires minimal maintenance due to it’s simple design and rugged construction. A few tips will help keep your instrument working well for years:
-
Wipe down the instrument with a damp cloth at the end of the day. Do not use harsh chemical cleaners as they may damage the plastic components. Soapy warm water may be used for excessive accumulation. Do not submerge the instrument
-
If operating in particularly dusty conditions, remove the rotating platen as detailed in changing the batteries and clean the sliding surface between the platen and the aluminium base plate.
Replacing the Batteries
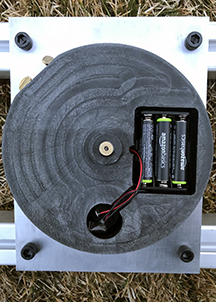
The three AAA cells that power the laser will last for many deployments. When the laser becomes weak or non-functional, replace the cells with any alkaline or rechargeable cell. Do not mix cell brands or types.
- Using the included 5/32” hex key, loosen the retaining collar and slide if off the underside boss of the rotating platen.
- Lift the platen off the aluminium base plate and turn it over.
- Replace the battery cells.
- Reverse the procedure for assembly.
Calibration
Your LSO100 is factory calibrated, but should be checked and recalibrated as necessary, especially after experiencing dramatic changes in temperature or humidity, or after long-distance shipment. Calibration is simple and only takes a few minutes.
- Take the instrument away from any source of magnetic interference such as rebar embedded in concrete, power lines, etc.
- Using your compass on the ground (a piece of plywood, acrylic, or other non-mangetic material may be helpful), mark a line of known orientation.
- Set the LSO100 up on non-magnetic supports such as wood blocks. Ideally these should be at least as tall as the post-holes are deep.
- Using the included 5/32” hex key, remove the top plate retaining ring.
- Using the included 1/16” hex key, loosen the two set screws on the laser boss.
- With the compass inserted as if taking a measurement, turn on the laser and rotate the top plate until the compass reads the same measurement it did on the ground. Never look directly into the laser!
- Using a pair of pliers, gently grip the laser module and rotate it to line up with the mark on the ground. Take care to not rotate the plate. Iterate and refine this several times if necessary. Using a soft material such as a rubber strip between the pliers is recommended if they have serrated jaws to prevent marring the case finish of the laser. Do not turn the laser more than 90 degrees in either direction to prevent excessive twisting of the power supply wiring. Remove the compass to observe the state of the wires if necessary.
- Gently tighten the set set screws once the laser is aligned.
- Verify calibration of the instrument.
- Reinstall the retaining ring and gently tighten its set screw.
Repair and Service
Should your orientation tool become damaged and need repair, please use the contact form on our website and we will help arrange shipment and provide repair estimates. We can also drop-ship repair parts directly to you!
Optional Accessories
Found a problem that your LSO100 isn’t ready for? We have accessories available and can help design a new accessory for your application. Current options include:
- Extended length cross-arms for larger holes/vaults (48” total length or custom length available)
- Extended length leveling screws (6”) Will not fit into hard shell case when installed onto instrument
- Non-magnetic risers for above ground installations